Electric Violin Build Part 3

During the initial draft, I planned to incorporate an on-board active pickup for the piezo of the violin. But after carving out the compartments, only did I realize the space leftover was not big enough to contain the electronics. So I had no choice but to leave the compartments as is, and connect the bridge pickup to the output jack directly. I shall try to plug the output into the original planned pickup circuit, which is the popular Don Tillman's preamp, and hope that gives me a signal.

Carving compartments for electronics

I decided to carve out three cavities from the main body, for the 9V battery holder, a smaller cavity for the preamp circuit, and one more to fit the output jack. I forgot to take pictures while working on them, but here's a picture of it when done.

cavities

I decided to merge the audio jack's cavity with the one supposedly for the electronic circuit. I also started to fill the gaps between the joints using wood filler, as can be seen in the picture. I couldn't find a way to make the "floor" of the holes to be smooth, despite running the chisel over them multiple times. They were too small to sand nor file properly too, so I got lazy and decided to left them as is as they won't be visible anyway.

The saddle

One note about the saddle here. It doesn't really deserves its own section (I don't even have a closeup picture of the saddle), but I felt that this was the best chisel work I did throughout this project. Please, marvel at my workmanship on the saddle's mortice!

saddle

Gluing the fingerboard

Now that everything is in place, it's time to glue the fingerboard. Right before I was about to glue it on, I realized there was a spot under the end of the fingerboard which would be hard to paint once I glued it on. So I decided to do the first round of painting on that spot prior to gluing.

paint1

In the image, there is a block of wood where the bridge is supposed to be. This was due to the incorrect fingerboard angle due to the mistake I made when cutting the angled piece at the beginning. The incorrect angle caused the bridge to be way lower than intended when compared to my acoustic violin, so I added that block as a shim for the bridge. After this, it was finally time to glue on the fingerboard.

fingerboard

Finishing touches and painting

With the fingerboard glued in place, I drilled a hole for the endpin. At this point my membership for the woodworking workshop has ended, so I had to use the hand drill I had at home to drill it. Turns out I needed a 7.5mm diameter drill bit, which I did not have and I had to buy one before I could proceed.

endpin

Finally, the time for the paint job. I only had one experience of spray painting wood in high school, which did not turn out well as I remember. But nevertheless, I had to paint this violin as I used too much wood filler to cover up my mistakes, which looked terrible. I decided to spray paint the violin with black paint.

paint2

Turns out spray painting wood directly from a spray can was not such a good idea. The paint failed to cover imperfections on the wood, and the grain were raised and became rather prominent. I should give it a layer of paint primer before applying any paint in the future. But still, I like it for what it is!

paint3

Final accessories

There were still work to do before the violin can be stringed and played. Firstly, I needed a bridge for it. I bought bridge blanks online, and followed instructions to set it for my violin. Turns out, my shim was too high! So the completed bridge for my violin is rather short. Luckily it could still be adjusted for the correct string height.

bridge

I used my knife to carve the shape of the bridge according to the provided template in the violin making guide after marking the correct string height from the fingerboard. I then filed the edges smooth, before shaping the front (fingerboard facing side) of the bridge to be slightly rounded using a file. The top edge of the bridge was filed to be around 1.2mm thick. I also bought a chinrest online, which I drilled holes to fit the screws accordingly to attach to the body.

I had an old tailpiece lying around, with a tailgut made from wire of some sort. I also bought a new tailpiece with built-in fine tuners. Now when attaching the tailpiece, I decided that I liked the older one more, so I had to remove the old tailgut and replace it with the one from the newer tailpiece. After retrieving wire cutters to cut the old tailgut, I took one of them off the table and went ahead to cut it directly, only to realize that I had cut into the newer tailgut!

tailpiece

There was nothing else I could do as I don't have extras or any suitable replacements for a tailgut, except to purchase a new one online. So the project was unexpectedly stalled at the point of near completion.

Two weeks later...

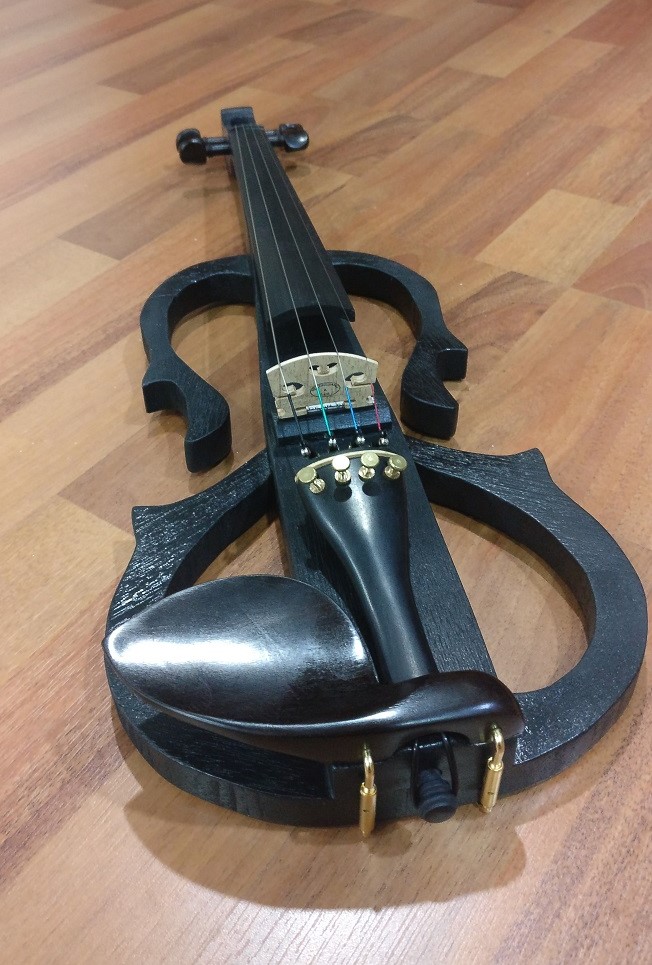
Well the replacement tailguts (yes I bought extra) have arrived, so now I can finally finish assembling my violin! Here it is!

complete1 complete2 complete3

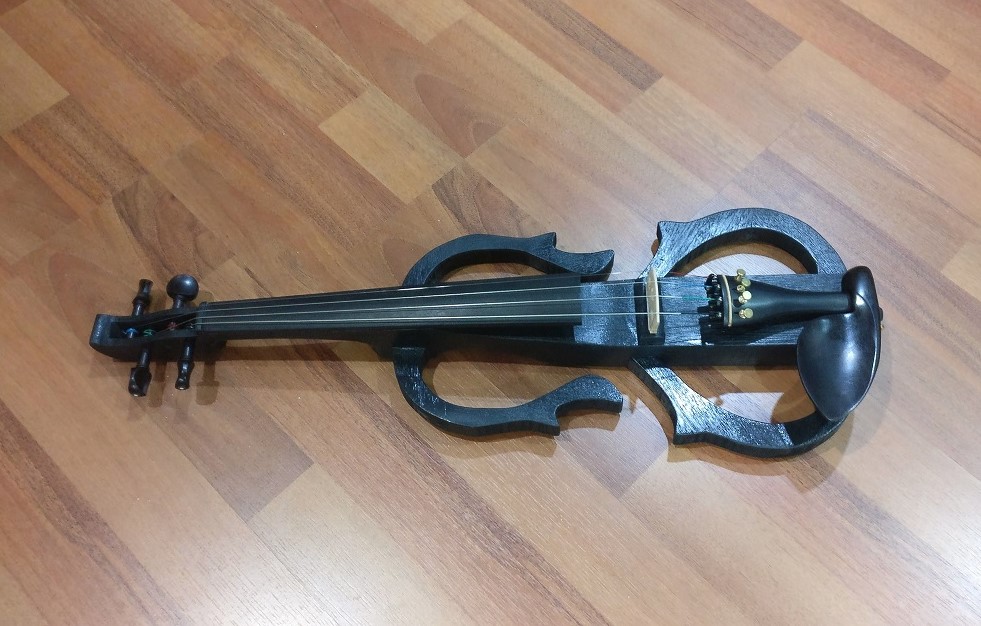
Conclusion and final words

I have still yet to hook it up to an amplifier to test if the pickup actually worked, but it produces a rather muted tone when I play it. I did not shape the neck correctly, so now the neck is rather blocky and gets in the way of playing to some extent, but it is still playable. It is also rather heavy compared to my acoustic violin, so I aim to make enhancements to the weight if I make a second one, which I probably will!.

I feel that the upper half of the body outline serves no actual purpose other than cosmetic reasons (at least for me), which I guess I will remove in the next build as well.

It has been one hell of an experience making this violin. Overall, this project took about three months from the first day of purchasing wood to the day of stringing it up, as I only had time to work on it during weekends. It costed about half the price of the cheapest electric violin I could find, and what made it better was that it was made completely by myself (except the accessories \cough**)!

Anyway, that would be all for this build log. If I ever make another one, I will post another build log of it as well. Thanks for reading!


Electric Violin Build Part 2

In my previous post, I completed the "core" body (which is what I'll refer to it now) of the electric violin. The next step of the build was to cut and shape the "outline" of the body, which would require the use of the bandsaw. I needed the outline so that I could still attach my existing shoulder rest on it while playing.

Making the body outline

As I couldn't find wood that was big enough for the entire part, I had to cut the pieces out separately and make a join between them. I believe the joining technique I used (which I looked up later) is called a "lap wood joint"?

To make the joint, I left some overlapped areas where the blocks meet, and removed half the thickness of the wood from each piece. This was the first time I ever used a chisel, and I daresay I did a rather good job with it! :D But anyhow, there were still gaps between the joints, which I'll have to fill up using wood filler later.

body1 body2 body3

In the future, I should probably line up the wood grain so that they are all running in the same direction.

Fitting the outline to the main body

To fit the outline, I cut mortices in the core body to the same size and thickness of the outline parts. It took some fiddling (pun!) and a LOT of filing to get the correct width. Actually, not the correct width as there were gaps after getting them to fit in.

mortice mortice_fit

After fitting the body, it started to actually look like a violin. It lives!! outline_fitted

Carving and shaping the pegbox

The next step was to carve out the compartment for the pegbox. Using the drill press, I drilled four holes where the pegs would be, and then several more holes in the chamber to the depth I wanted, and slowly chiseled out the remaining wood. The result was not as clean as I hoped it to be, as I chipped the tip of the scroll. But at least it looked decent from a distance.

pegbox

With the chamber carved out, I tried fitting the pegs. I bought a peg reamer online, and used the reamer to make the holes suitably sized for the pegs (which I bought online as well).

reaming pegs

At this stage, I tried holding the violin in my usual playing position, and I felt something was weird with the bottom of the scroll. Turns out I needed to smoothen the base of the scroll, else it would get in the way of my index finger.

smoothing1 smoothing2

The next step would be carving out the compartments to store the battery for the on-board preamp, preamp circuit electronics, and an input jack, which I shall continue in the next post.


So I Made an Electric Violin

I taught myself how to play the violin two years ago, and one of the problems bugging me was how hard it was to practice without disturbing others. Sure there were those silent practice violins for sale, but they were way out of my budget. After seeing people posting build logs of their self made electric violins, I decided that it was not impossible to make my own, although I had limited access to tools and zero wood working knowledge.

Drafting the design

The first step was to come up with a design that adheres to standard violin measurements. From the various sources I found online, I find this site by Vojtěch Blahout to be the most complete and informative, with complete step by step guides to making a traditional acousting violin. The site also provides vector graphic tempaltes in adherence to a standard violin, which I have based most of my measurements on. For any of you who plan on going down this path, I highly recommend this site as a starting place.

After some researching and doodling, I finally came up with a plan for my electric violin design: plans

Wood and tools

With the design in place, it was time to source for wood and ways to process it. In the place I live in, it was uncommon for people to dabble in woodworking as casually as people in western countries (or at least that's my impression). It was extremely rare for people to just have a bandsaw or a drill press at home. Fortunately, I manage to find a woodworking workshop in a community center in my area, which charged a monthly fee for using their tools. They had just the tools I expect I would need: a bandsaw, sanding belt and also a drill press. Perfect!

Having the tools out of the way, I needed to find wood to work on. The best wood I could get my hands on was planks of poplar, 70mm wide and 19mm thick. I'll just have to glue them together so they're big enough for the different parts of my violin.

Starting the project

To make the main body of the violin, I cut two pieces of wood to suitable length and glued them together. I then needed an angled piece for the neck, so I had to cut off a slice of the wood at a weird angle. Inexperienced as I was, I botched it. As the wood was too thin and at a weird angle for the bandsaw, I decided to cut it by hand, which was probably not a good idea.

mistake1 mistake2

I ended up with a huge chunk chipped off in the centre. In hindsight, it would be a better idea to glue the two pieces together to give it thickness before feeding it to the bandsaw.

Finally, I glued the piece of wood that was supposed to be the neck onto the slanted surface.

neck1 neck2

Making the scroll and shaping the body

While waiting for the assembly to dry, I started working on the scroll. As I was pretty sure it wasn't worth the hassle to carve an actual scroll, I just made a simple one out of two planks glued together. Unfortunately, I got too excited and forgot to take some pictures of the scroll while working on it.

After the glue has dried, I shaped the profile of the neck on the wood using the bandsaw. Luckily I did it right this time. The scroll was then glued on to the neck piece after I cut out a mortice that matched the neck's profile.

neck_profile scroll

With the scroll glued, I proceeded to thin down the body into the correct width and shape. body_shaped

With that, the general shape of the violin is done. the next step was to make the pieces that make up the body "outline". As this post is getting quite long, I'll put it into another post. Part 2 here.